"USBtiny is a software implementation of the USB low-speed protocol for the Atmel ATtiny microcontrollers." - http://dicks.home.xs4all.nl/avr/usbtiny/
Ladyada has the USBtinyISP based on USBtiny and I decided to hook one up myself. I already got a programmer (sparkfun AVR pocket programmer), but I consider it fun to make my own tools.
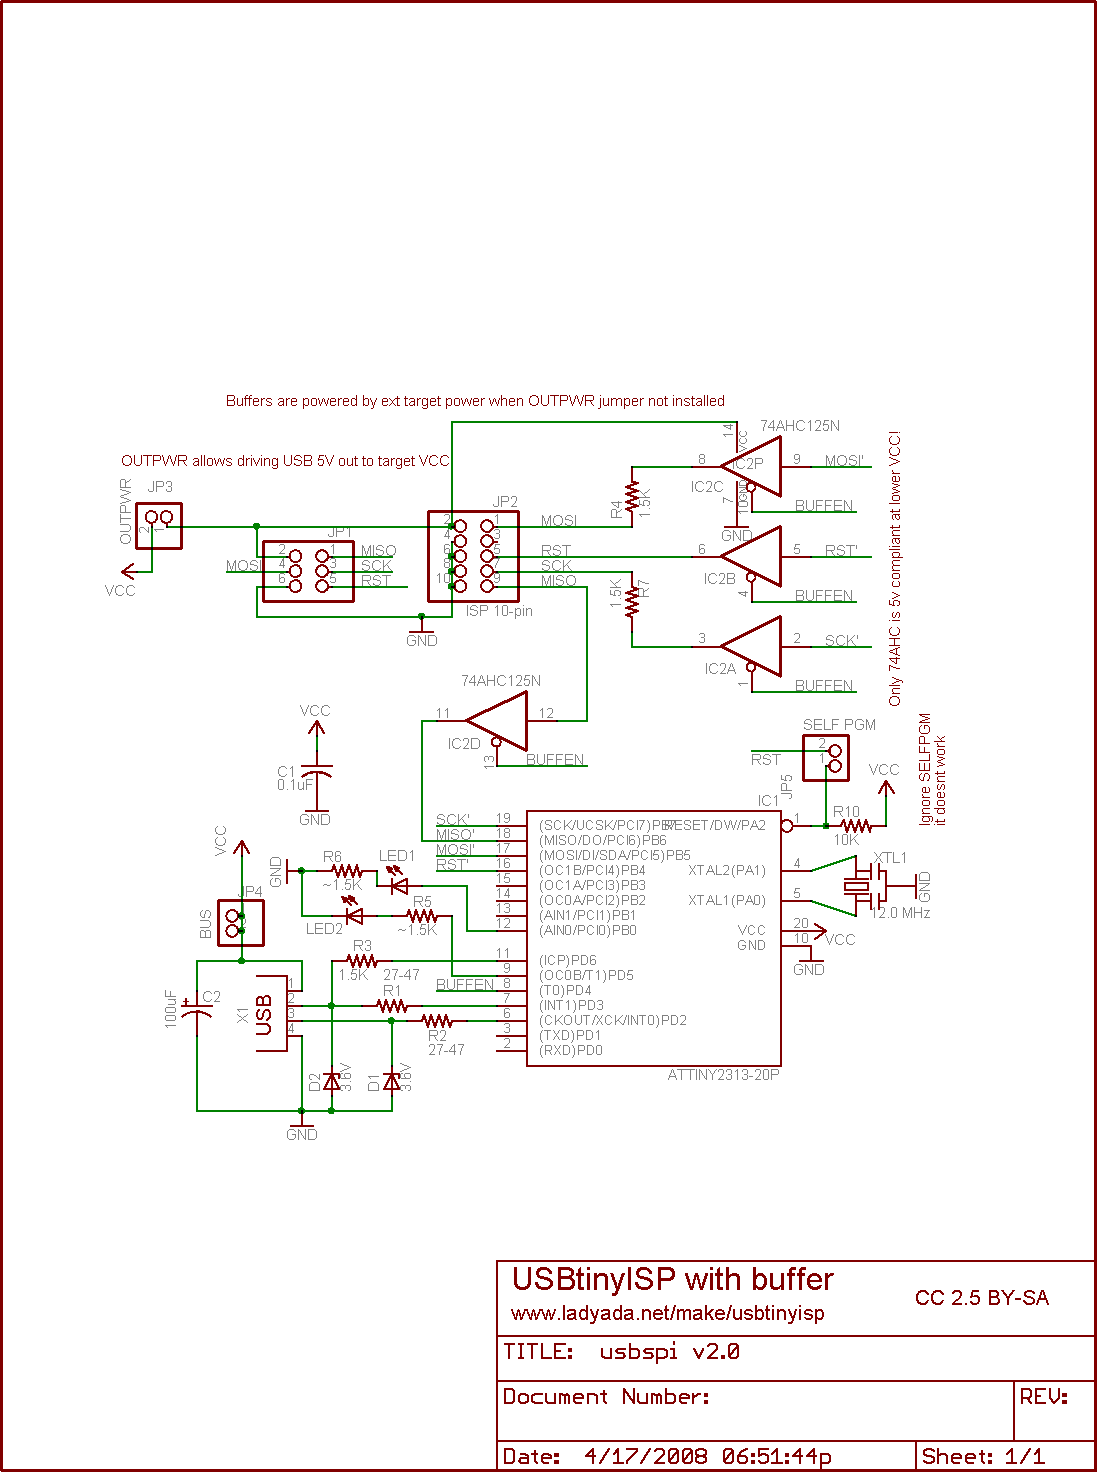
It is a great thing LadyAda does by providing schematics and files, so you really should go buy their kit for the programmer instead of doing what I do!
 |
| The ATtiny2313 on a breadboard |
The datasheet for ATtiny2313
avrdude help http://www.ladyada.net/make/usbtinyisp/avrdude.html
The avrdude commands from the Makefile modified to my avrdude.conf location
I just moved to my avrdude folder (D:\daniel\programmering\arduino-1.0.3\hardware\tools\avr\bin) using cmd.exe and ran the command for setting the fuses.
avrdude -c usbtiny -pt2313 -C D:\daniel\programmering\arduino-1.0.3\hardware\tools\avr\etc\avrdude.conf -U hfuse:w:0xdf:m -U lfuse:w:0xef:mWhere D:\daniel\programmering\arduino-1.0.3\hardware\tools\avr\etc\ is where I have my avrdude.conf.
After setting the fuses its time to write the hex file to the chip:
avrdude -c usbtiny -pt2313 -C D:\daniel\programmering\arduino-1.0.3\hardware\tools\avr\etc\avrdude.conf -B 1 -U flash:w:main.hexI actually moved to main.hex file from the \usbtinyisp\spi folder to the avrdude folder in order for the avrdude to find it.
Then I wired the connections to the USB and tried power it by usb. The LED lights up! Showing us we have USB connection

 |
| I use the sparkfun USB pinout |
The Ladyada schematics includes a levelconverter that I decided to skip until this circuit gets soldered... Datasheet for the 74HC125. The idea for the level-converter is that the programmer can be powered by usb and the circuit being programmed can be programmed at another voltage level. The level-converter stops the target circuit from being fried.
 |
| http://www.ladyada.net/make/usbtinyisp/parts.html |
I decided to hook up the attiny8 circuit directly instead.

 |
| To the left the ATtiny85V , middle ATtiny2313 and to the right USB level conversions. |
In order to know if it works I ran
...in response! success!
Now I need the board description for the Arduino IDE.
From http://hlt.media.mit.edu/?p=1695 I got the link to
https://github.com/damellis/attiny/archive/master.zip
That I downloaded and copied into the hardware folder. Restarted Arduino IDE and found the ATtiny85 board under boards.
I modified the blink sketch to use pin 2 instead of 13
Very satisfied!!!
I think I will wait until I get a ZIF socket to solder this one up... or at least part of it...
avrdude -c usbtiny -C D:\daniel\programmering\arduino-1.0.3\hardware\tools\avr\etc\avrdude.conf -p m8And got:
avrdude: AVR device initialized and ready to accept instructions
Reading | ################################################## | 100% 0.03s
avrdude: Device signature = 0x1e930b
avrdude: Expected signature for ATMEGA8 is 1E 93 07
Double check chip, or use -F to override this check.
avrdude done. Thank you.
...in response! success!
Now I need the board description for the Arduino IDE.
From http://hlt.media.mit.edu/?p=1695 I got the link to
https://github.com/damellis/attiny/archive/master.zip
That I downloaded and copied into the hardware folder. Restarted Arduino IDE and found the ATtiny85 board under boards.
I modified the blink sketch to use pin 2 instead of 13
int led = 2;Then I uploaded it using programmer (CTRL+SHIFT+U)
 |
| Blink sketch on ATtiny85 |
I think I will wait until I get a ZIF socket to solder this one up... or at least part of it...
No comments:
Post a Comment